Installing your new Hardware tracker
This step-by-step guide will help you easily install your new TMR hardware GPS tracker in your vehicle.
- Home
- »
- Hardware tracker installation
Choosing your install method
Plug & Play
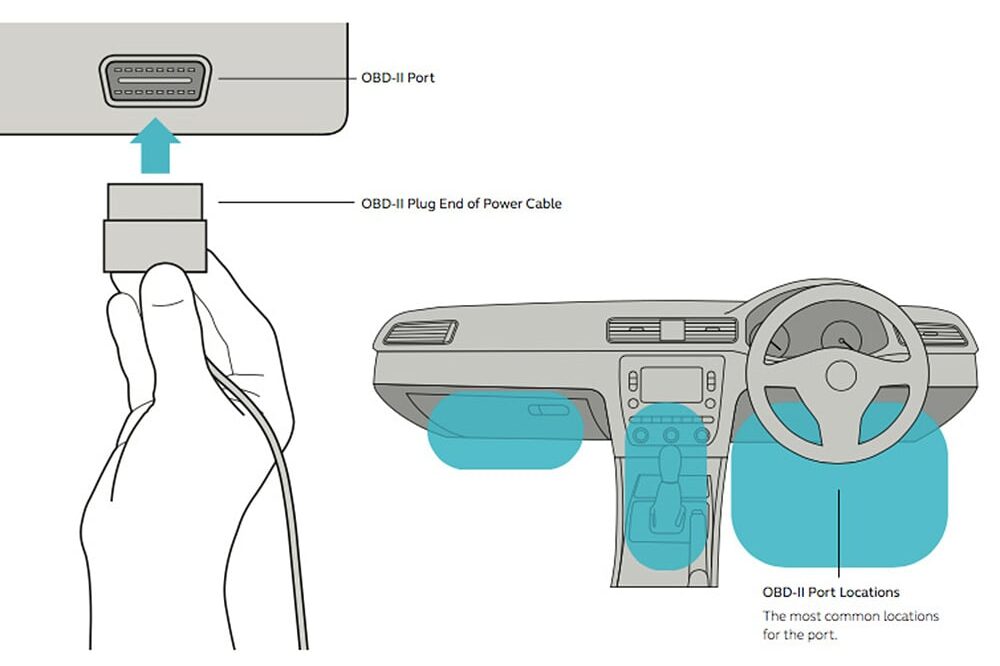
Looking to get up and running ASAP? The TMR-S8 GPS tracker includes a Plug & Play power cable to make installation quick, easy and DIY! Simply locate your vehicle’s OBD-II diagnostic port under the dash and plug your new tracker in – easy!
Hardwire
When it comes to installing Track My Ride in your vehicle for long-term use, hardwiring your new tracker is the most secure and reliable option. This installation method is ideal if you plan to keep the TMR device in your vehicle indefinitely, as it ensures a stable power connection and minimizes the risk of the tracker being dislodged or disconnected.
Install FAQs
Looking for some help or guidance with your installation? No worries, we have some helpful hints at the bottom of the page.
Plug & Play installation
-
Install time 2 to 5 minutes, or less.
-
Setup your account To start, you need to create a Track My Ride account and link your new hardware tracker to it. TMR will automatically track all your vehicle’s movements in real-time when you're on the move, and enter a low power sleep mode while you're parked up.
Once you setup your new account, your tracker will be activated on the mobile network. This activation usually takes about 5 minutes or less. -
Find your OBD-II port Locate your OBD-II port under your dash, it's the one your mechanic uses to diagnose your car. If your vehicle does not have an OBD-II port, please follow the hardwire instructions below.
-
Plug in your tracker Connect the included Track My Ride OBD-II power cable to your car and to your tracker. You will notice the two green lights turn on. The navigation light will flash when it has acquired a GPS signal and position. Next, fit your new tracker under your dash. Be sure not to install the tracker in a location where it or its wiring could block the deployment of an airbag. You should also ensure your tracker cannot come in contact with any water. Face the side of the tracker indicated as such towards the sky. GPS signals can penetrate plastic, glass, fiberglass and light metal, but try to keep the metal to a minimum. For the best signal, place the tracker as high under the dash as possible with minimal metal above it. If your GPS tracker is not able to acquire a GPS position and track your drives accurately on the map, you may need to relocate your tracker to a different spot.
-
Confirming your install and finishing up Before you reassemble any panels you unscrewed, with your tracker in its chosen location you should confirm your installation by taking your vehicle for a quick drive around the block (1km of driving). You want to confirm your tracker is operating correctly in your new TMR account, with the path of your test drive and your current location shown on the map. Once you confirm it's all working, you can finalise your install and reassemble any panel work.
Hardwire installation
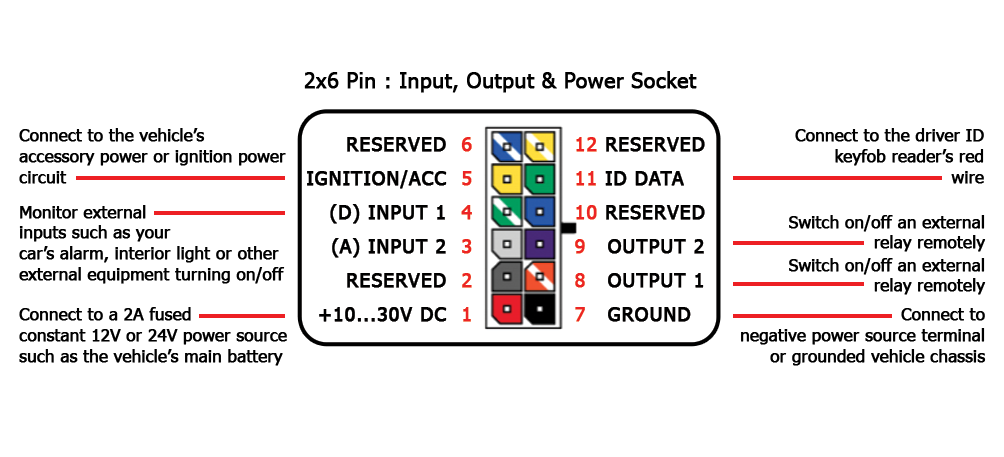
(Pinout shown for Model TMR-S8 and TMR-S8W)
-
Install time Typically 60 minutes.
-
Setup your account To start, you need to create a Track My Ride account and link your new hardware tracker to it. TMR will automatically track all your vehicle’s movements in real-time when you're on the move, and enter a low power sleep mode while you're parked up.
Once you setup your new account, your tracker will be activated on the mobile network. This activation usually takes about 5 minutes or less. -
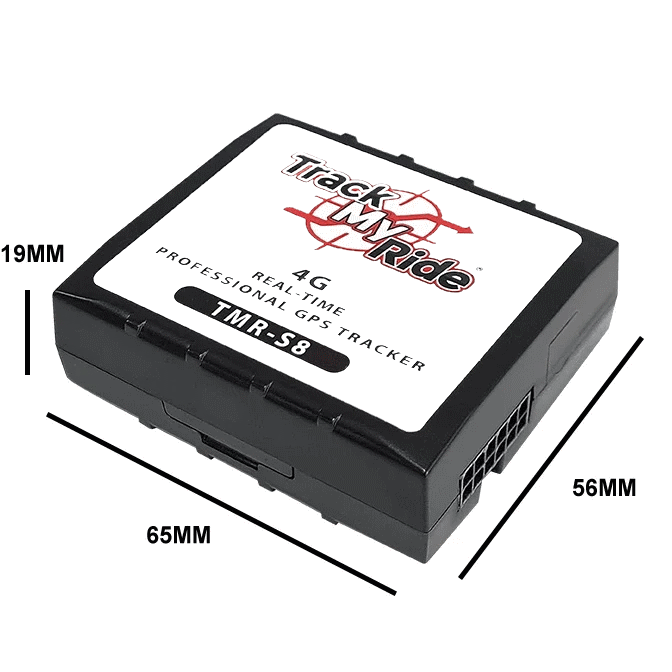
Determine your installation location When selecting the optimal location to install your GPS tracker, prioritise a spot that offers strong GPS signal reception, steering clear of areas enclosed by thick metal that could reduce the GPS signal (see the FAQ below). Opt for a location that is easily accessible for installation and maintenance, yet discreet enough to avoid tampering. Ensure the chosen spot provides protection from the elements to maintain the device's longevity. The ideal installation location may vary based on your vehicle type, with common options including underneath the dashboard, beneath the seats, or in the trunk. Be sure not to install the tracker in a location where it or its wiring could block the deployment of an airbag. You should also ensure your tracker cannot come in contact with any water. If unsure, consult your vehicle's manual or a professional installer for guidance specific to your make and model.
-
Find the power source and run the wires To hardwire your GPS tracker, connect it to your vehicle's electrical system by locating a fused constant positive 12V or 24V power source that can supply at least 1A of current, and a ground wire. You will need to use a multimeter to confirm the power source. Plan the wiring route from the power source to the installation location, using existing channels to keep wires hidden and protected. Strip and connect the tracker's red power wire as indicated on the wiring pinout to the positive 12V or 24V source (use a 2A fuse if connecting directly to the battery) and the black ground wire to the ground point, using solderless connectors or solder for a secure connection. For ease of install, you can also opt to use a fuse tap, available from your local auto or electronics store.
You need to confirm at this stage that the two green LED lights on your tracker have turned on or are flashing. The navigation light will flash when it has acquired a GPS signal. If the navigation light is solid and not flashing, you may need to choose a different installation location until a GPS signal can be acquired. See the FAQ below on things that can block the GPS signal. Finally, use zip ties or electrical tape to secure and tidy up the wires, ensuring they won't interfere with moving parts or the deployment of airbags and so the installation looks neat and professional. -
Confirming your install and finishing up Before you reassemble any panels you unscrewed, with your tracker in its chosen location you should confirm your installation by taking your vehicle for a quick drive around the block (1km of driving). You want to confirm your tracker is operating correctly in your new TMR account, with the path of your test drive and your current location shown on the map. Once you confirm it's all working, you can finalise your install and reassemble any panel work.
-
Pro tip - Power consumption If your vehicle has a small battery such as a motorcycle, you can change the power consumption sleep mode options for your tracker from within your Track My Ride account. To edit the power settings and how your tracker goes into sleep mode, navigate to Vehicles -> Edit the vehicle -> Change the sleep mode.
Hardwire optional accessories installation
Driver ID
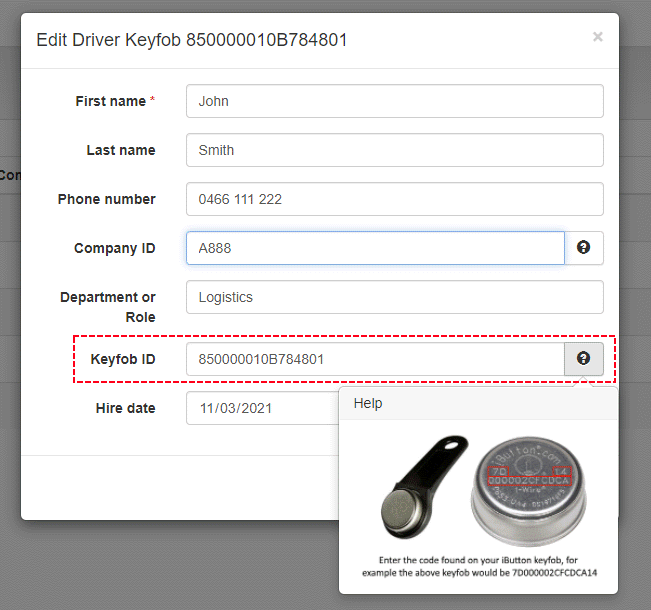
Track My Ride supports driver identification via a driver ID keyfob reader and driver ID keyfobs (sold separately, available from our team [email protected]) which can be used by your drivers to maintain the records of who is operating your vehicle in your reports. The reader will register the unique ID of the keyfob when the keyfob is pressed to the reader for 1 second. The keyfob’s unique ID will be matched against one of your existing drivers, or a new driver record for the keyfob will be created automatically if no match was found.
You can also install the Driver Login Reminder functionality below to give your drivers an audible notification to remind them to log in to the vehicle each time it is driven.
Driver ID reader – wiring & installation
The keyfob reader has two wires, red wire (centre pin of the reader) and black (outer reader contact). The red wire should be connected to the wire marked Keyfob Data / ID Data (harness pin 11) on your tracker. The black wire of the reader should be connected to a common ground that the tracker is connected such as your vehicle’s chassis or ground (harness pin 7) on your tracker. Install the Driver ID Reader in an easy-to-access location in your vehicle.
- Keyfob reader red wire: Connect to wiring harness pin 11 marked Keyfob data / ID data
- Keyfob reader black wire: Connect to tracker’s power supply common ground or vehicle chassis
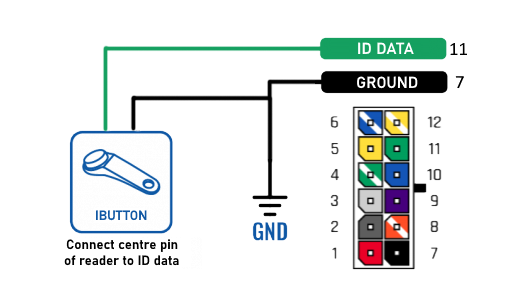
(Pinout shown for Model TMR-S8 and TMR-S8W)
Driver Login Reminder with a buzzer (optional) – wiring & installation
Driver login reminder allows you to install a buzzer (customer to supply) in your vehicle that will sound when the vehicle is turned on until the driver has presented their Driver ID keyfob. This gives your drivers an audible reminder to log in to the vehicle each time they go for a drive ensuring your drivers are recorded correctly in your reports.
Step 1 – Wiring it all up
1.1 Complete your vehicle wiring as follows (Pinout shown for Model TMR-S8 and TMR-S8W). The output channel pin 8 provides a switchable path to ground. It defaults to off/high resistance.
1.2 Turn on the vehicle’s ignition so that +12V/+24V is present on pin 5. The tracker will recognise this wire has been connected and automatically be reconfigured so that engine on/off is detected via this wire instead of the default via incoming voltage >13.2V
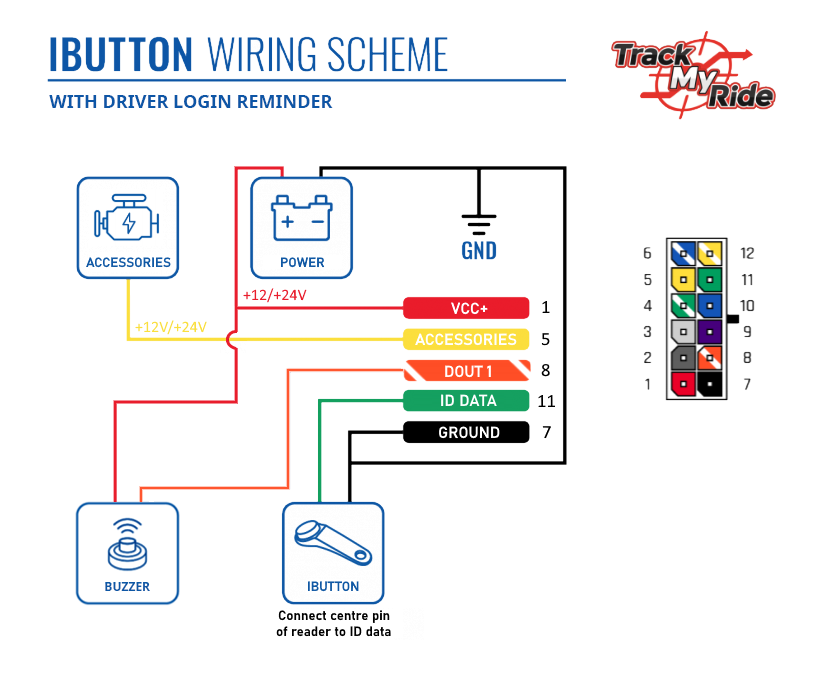
(Pinout shown for Model TMR-S8 and TMR-S8W)
Step 2 – Enable driver login reminder for this vehicle
2.1 Press the Refresh button above the vehicles tab to reload your tracker’s current installation state.
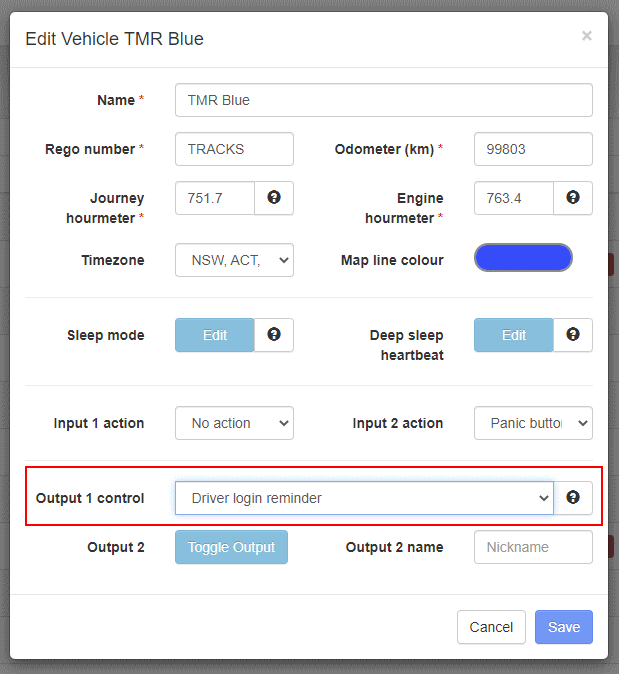
2.2 Enable the driver login reminder functionality for your vehicle as indicated below and click save. The change to turn on this function will be applied to your tracker the next time it’s in communication with our servers such as when motion is detected or +12V/+24V is detected on pin 5.
Note: You must have connected the Pin 5 on your wiring harness to an ACC/Ignition power source and +12V/+24V must have been present on the wire at least once before you can enable this setting. You may need to wait up to 15 minutes after first completing your wiring for the option to become available below, press Refresh from step 2.1 if the option is not yet available to select and you have confirmed your wiring is correct.

Step 3 – Testing the installation
3.1 After you’ve enabled the setting for the vehicle under Output 1 control the tracker must receive this new change before it will take effect. You can do this simply by turning on the Ignition for your vehicle. This will cause the tracker to connect to our servers and receive your new settings. You can also monitor that the event has been received at the tracker in the TMR app by navigating to Vehicles -> Events.
3.2 When you have confirmed the update event has been received by the tracker, your buzzer will now turn on when the vehicle is started until your driver keyfob is presented to the reader.
3.3 Press and hold the keyfob to the reader for 1 second and the buzzer will turn off, indicating you have successfully logged into the vehicle. The buzzer will remain off and the driver will not need to rescan their keyfob until the vehicle is turned off for at least 30 seconds.
Driver Login Reminder Scenario
| Step | Action | Ignition/ACC Pin 5 | Output 1 Pin 8 | State |
| 1 | Vehicle is off | 0V | OFF – High resistance to ground | The buzzer is silent, as pin 8 does not provide a path to ground. |
| 2 | The driver turns on Ignition/ACC | >= +12V | ON – Low resistance to ground | The buzzer is audible, as pin 8 now provides a path to ground for power to flow through the buzzer. |
| 3 | Driver tags on their keyfob | >= +12V | OFF – High resistance to ground | The buzzer is silent, as pin 8 does not provide a path to ground. |
| 4 | The driver starts the vehicle | >= +12V | OFF – High resistance to ground | Vehicle has started |
| 5 | The driver turns off the vehicle | 0V | OFF – High resistance to ground | 30 seconds after the driver turns off the vehicle the process begins again from step 1. |
Panic Button
The panic button is a button (sold separately, available from our team [email protected]) that can be installed in your vehicle and used to trigger a notification to yourself or other key personnel of your choice when pressed in your vehicle. It’s a very useful feature for improving the safety of the person operating your vehicles.
Panic Button Wiring and Installation
The panic function is triggered when +12V or +24V is detected on your Track My Ride hardware’s input channel. You can configure either input channel 1 or input channel 2 within your Track My Ride account to trigger the Panic Button functionality when the button is pressed.
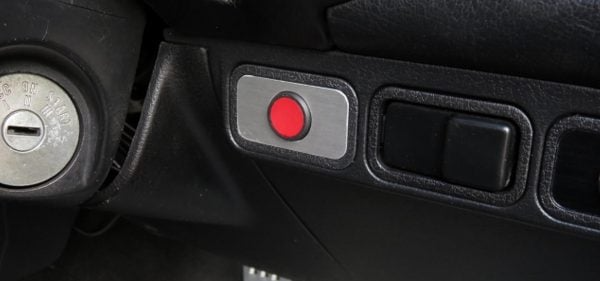
- Connect a +12V or +24V power source to one of the wires on a normally open momentary push button. You must use a normally open momentary push button so that there is no power present on the input line when the button is not pressed.
- Connect the other wire of the normally open panic button to the wire marked ‘Input 1’ or ‘Input 2’ on your Track My Ride hardware.
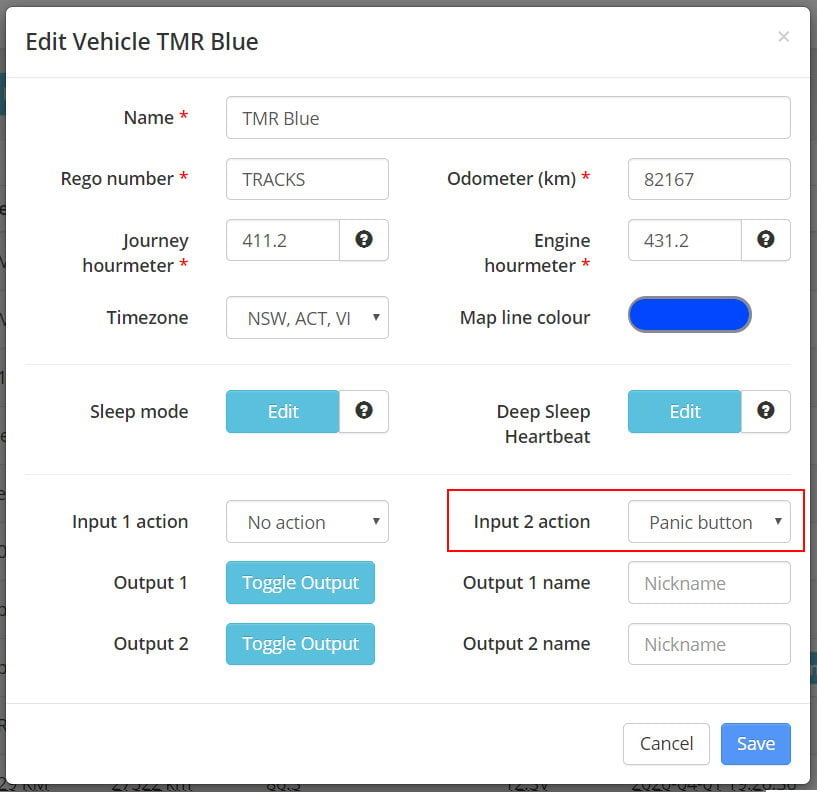
- From within your Track My Ride account at https://app.trackmyride.com.au – Navigate to your vehicles tab, edit the vehicle’s properties and enable the Panic Button action against the input that you connected the panic button to. In the below example, we have connected the panic button to Input 2.
- Configure the settings and notifications for your panic button in your Track My Ride account at https://app.trackmyride.com.au under account settings -> Panic button.
- Test your panic button in the vehicle to ensure it’s operating correctly and that you received the push notification from the TMR app on your mobile phone.

Inputs & Outputs
Inputs
Track My Ride hardware tracker model TMR-S8 and TMR-S8W feature 2x positive voltage detection input channels. Inputs allow the tracker to know when an external event is taking place – like your vehicle’s alarm has triggered or a door has been opened. In these instances, it would be accomplished by connecting one of the input wires to the alarm’s +12V signal (or 12V horn) or the vehicle’s interior light +12V signal.
Inputs monitor for an external voltage being present on the input channel. The input is “On” when >= 9V is detected, and “Off” when no voltage is present (0V). As such inputs can be connected to any external switched power source or device to monitor when they turn on & off, as long as the device being monitored is connected to the same common electrical ground as the hardware GPS tracker’s ground wire.
Inputs can be used in conjunction with our alert system to notify you via SMS, Email or Push Notification when an input channel changes from Off to On, or On to Off.
Outputs
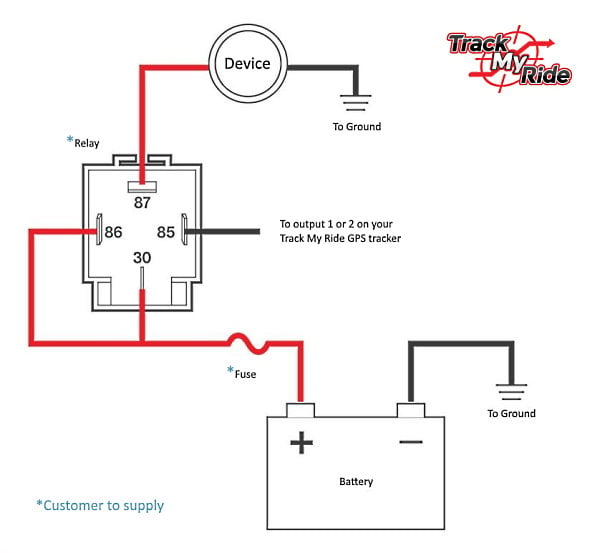
Outputs provide a remotely switchable path to ground. Outputs must be used in conjunction with a relay if you’re going to be switching more than 500mA of current. Relays can then be used to switch on and off a high-current external device – like a horn or other device. The outputs can be switched from within your Track My Ride account when your tracker is within the mobile network coverage area. Changes to your outputs will be sent to your tracker when your tracker next communicates with our servers. If you update your outputs while the tracker is in a sleep state, the changes will be applied when your tracker next wakes up (Default once per hour) and connects to our servers to receive the command. The tracker will wake from its automatic sleep mode and connect to our servers, receiving your event to change the output when it detects motion, or detects +12V or +24V on the ignition sense, input 1 or input 2 wires.
How to toggle an output channel
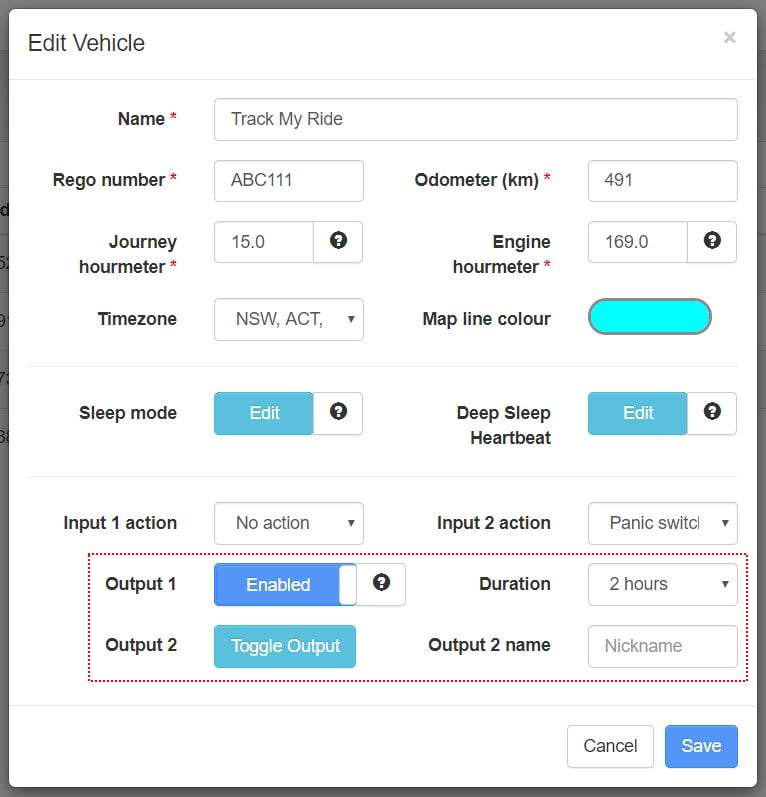
To control the state of an output, log in to your account at https://app.trackmyride.com.au or use the mobile app and edit your vehicle’s properties. From here you can toggle the output to an On or Off state and specify the duration of the state change. After the duration expires, the output’s state will change to the opposite state.

Frequently asked questions
For Plug and Play installation, you don't need any specialty tools. We even include a patch of Hook and Loop mounting tape in the box.
For Hardwire installation, in most cases you'll only need a few basic tools, such as a screwdriver, wire strippers, multi-meter and electrical tape.
The ideal location for your GPS tracker depends on your vehicle type. Common installation spots include under the dashboard, beneath the seats, beneath the carpet of the rear parcel shelf, or in the boot. Generally we recommend to install the TMR hardware tracker under the dash for both Hardwire and Plug & Play installs.
When choosing a location, consider the following factors:
- GPS signal strength: TMR trackers have built-in high-gain antennas that can receive GPS signals through light metal, glass and plastic such as the material found under the dashboard. However, metal can diminish GPS signals from satellites to varying degrees, and too much metal may block the signal entirely. If you experience poor GPS signal or intermittent tracking, you may need to relocate your tracker.
- Orientation: Ensure that the side of the tracker marked "face this side towards sky" is oriented correctly. This will help ensure the best GPS signal reception.
- Confirmation of GPS signal: You can verify that the tracker has a GPS signal by checking the green Navigation LED light. The light will flash when the tracker has acquired a GPS signal.
By taking these factors into account and following the installation guide above, you can ensure that your new GPS tracker is installed in an optimal location for reliable performance.
You can either use the included Plug and Play power cable, which plugs into your vehicle's OBD-II (pronounced O.B.D. two) diagnostic port typically found under the dash or you can Hardwire the tracker into your vehicle's 12V or 24V power system.

Hardwire is a more permanent and secure install, ensuring your tracker won't easily be found or become dislodged while Plug and Play is great for those after a quick install.
While professional installation is available through any local auto electrician, Track My Ride GPS trackers are designed for plug and play DIY installation too. If you're comfortable working with basic tools and following instructions, you should be able to install the tracker yourself.
A Track My Ride GPS tracker is no different to any other aftermarket vehicle accessory. In most cases, installing a GPS tracker will not void your vehicle's warranty, as long as the installation is done properly and does not damage any existing systems. However, it's always best to check with your vehicle's manufacturer for specific warranty information that might apply to you or your vehicle.
Good question, if you're opting for the plug and play install you can be done in as little as 2 minutes!
For hardwire, the installation time can vary depending on your vehicle and the chosen installation location in the vehicle, but most installations can be completed within 30 to 60 minutes.
No. Track My Ride GPS trackers do not require charging before installation, as they draw power directly from your vehicle's battery.
When properly installed, a Track My Ride GPS tracker will draw a minimal amount of power (5 to 12mA per hour) from your vehicle's battery while the vehicle is parked, which should not impact your vehicle's performance or battery life. However, if you plan to leave your vehicle unused for an extended period, you can optionally disconnect the vehicle's negative battery terminal (If you hardwired your tracker) to prevent battery drain from the tracker and other vehicle accessories like dashcams.
When your vehicle is parked, the tracker enters a low power sleep mode. It will wake up when it senses motion or once per hour to reconnect to our servers and report its current location and status. To save more power you can also change this internal from within your TMR account or choose the Ultra Deep Sleep mode for maximum power saving.
Pro tip : If your vehicle has a very small battery such a motorcycle, we recommend using the Ultra Deep Sleep mode.
There are two green LED lights on the Track My Ride hardware trackers.
- Navigation light - The navigation light indicates the status of the GPS signal. It will flash once every 2 seconds when a GPS signal and location has been acquired.
- Status light - The status light will blink while the tracker is powered up and operational.
When the tracker is in sleep mode the lights will both turn off, with an occasional blink from the status light. Any motion detected will wake the tracker from its sleep mode.
The easiest way to tell if your Track My Ride GPS tracker has a GPS signal acquired is to look at the Navigation green light on the tracker itself. When a GPS signal has been acquired, this light will flash once every 2 seconds. You can also check the signal strength in the TMR app using the Raw GPS Data report to view the number of satellites.
- Q: Can metal objects block GPS signals?
A: Yes, metal objects can block or weaken GPS signals. The extent of the interference depends on the type and thickness of the metal. Thin metal, such as a car's roof or hood, may only slightly diminish the signal, while thick metal, like a shipping container or underground garage, can block signals entirely. - Q: Can any other material block GPS signals?
A: GPS signals will pass straight through glass, fibreglass, plastic and wood, however there are some other considerations for materials that can block GPS signals including :
> Carbon Fibre
> IR blocking window tint (Usually on luxury cars) - Q: Do buildings interfere with GPS reception?
A: Yes, buildings, especially tall ones with thick walls, can obstruct GPS signals. This is particularly noticeable in urban areas with skyscrapers, a phenomenon known as "urban canyons." In such cases, GPS accuracy may be reduced, or the signal may be lost altogether. - Q: Can trees or foliage block GPS signals?
A: Dense foliage, such as thick trees or shrubs, can weaken GPS signals. However, the impact is generally less severe than that of solid objects like buildings or metal. In most cases, the GPS receiver can still maintain a fix on the signal, albeit with slightly reduced accuracy. - Q: Do weather conditions affect GPS signal reception?
A: While GPS signals can pass through clouds, rain, and snow, heavy precipitation can sometimes weaken the signal. Electrical interference from thunderstorms or solar flares can also temporarily disrupt GPS reception. - Q: Can human bodies block GPS signals?
A: While human bodies do not block GPS signals completely, they can weaken the signal if the receiver is placed in a pocket or bag. For optimal signal reception, it's best to keep the GPS receiver exposed and facing the sky. - Q: Do power lines or electrical equipment interfere with GPS?
A: High-voltage power lines and some electrical equipment can generate electromagnetic interference that may disrupt GPS signals. However, this is relatively uncommon and typically only affects GPS receivers in close proximity to the source of the interference. - Q: Can GPS signals be blocked intentionally?
A: Yes, GPS signals can be intentionally blocked or jammed using devices called GPS jammers. These devices emit radio signals that interfere with GPS reception. However, the use of GPS jammers is illegal in many countries including Australia, as they can disrupt critical navigation and safety systems.
No worries, feel free to reach out to our friendly team by emailing [email protected] or calling us on 1300 553 022 during business hours M-F 9-5 VIC, Australia.
